Leveraging Microsoft’s Graph API with Power Automate

Recently (not so recent anymore), Microsoft broke many of their customers’ production workflows they had built in Power Automate (formerly Flow) using mail arriving into Shared Mailboxes as the trigger (they've since put it back but this is guide is still relevant for other use cases)
After mail had arrived, subsequent actions from a mail action would fail with the error of “Item Id doesn't belong to the current mailbox.” Microsoft’s official workaround was to use the Graph API but a savvy user on the Power Automate message board on Microsoft.com suggested to change the password of the user of the shared mailbox (not the delegate, the actual user created alongside the mailbox); i.e. mailbox name: “Shared Mailbox” username: shared.mailbox@domain.com.
If Microsoft did not suggest that workaround, and they didn’t, it leads you to believe if this method breaks they won’t care either.
Enter: Graph API via the HTTP action.
Before we get in weeds, the HTTP action is a Premium action. So, if you do not have the Premium license for Power Automate you cannot use it.
The first step is to get a custom connector created into Azure AD to leverage the API. This allows you to build your actions once and apply them to multiple Flows.
The guide I used to get the Custom Connector created was this one from Microsoft. https://docs.microsoft.com/en-us/graph/tutorials/flow
Once that is created, you can create different actions inside the connector then access them from your Flows under Custom when adding an action. I’ll go into detail about the actions I use later in this post.
In order for the Custom Connector to have the correct token, you need to get a token from the API. Below is a screenshot of what the action looks like using the HTTP connector. The action under the HTTP connector will be the “Parse JSON” action.
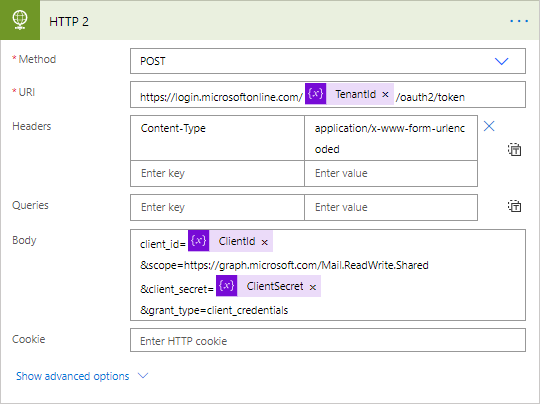
In the above screenshot, you’ll notice I stored the Tenant ID, Client ID and Client Secret from the Azure AD App Registration as variables.
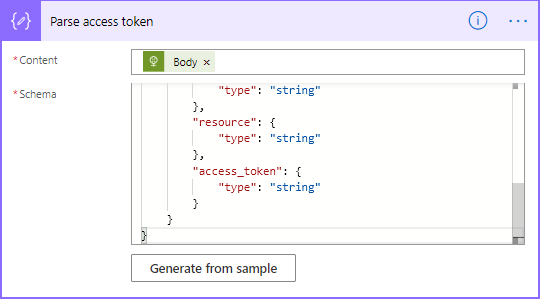
In this action, you can generate the JSON Schema using the below sample. Click “Generate from sample” and paste the below text. NOTE: after every HTTP action (including those with the Custom Connector) use the Parse JSON action in order to know the schema of the JSON.
{ "type": "object", "properties": { "token_type": { "type": "string" }, "expires_in": { "type": "string" }, "ext_expires_in": { "type": "string" }, "expires_on": { "type": "string" }, "not_before": { "type": "string" }, "resource": { "type": "string" }, "access_token": { "type": "string" } }}
Now to the Graph API Custom Connector actions.
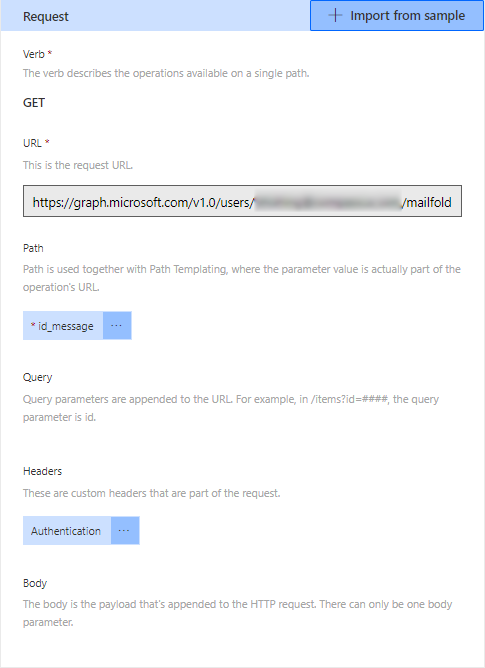
The below action gets all the attachments on a given email. Later, we’ll select the attachment we want to work with. The URL is truncated but is “https://graph.microsoft.com/v1.0/users/shared.mailbox@domain.com/mailfolders('Inbox')/messages/{id_message}/attachments”. The text inside the brackets in the URL becomes a parameter. NOTE: actions cannot share parameters so if you have multiple actions with the same parameter they’ll need to be named uniquely. When you create the request, you will see a section for header enter the below be sure to put a space after “Bearer”, you’ll use the token from the above JSON behind Bearer after a space.
Authentication Bearer
Much like the above action, I have an action that selects an attachment. To do this, change the URL to “https://graph.microsoft.com/v1.0/users/shared.mailbox@domain.com/mailfolders('Inbox')/messages/{id_message}/attachments/{id_attach}”; you’ll use the attachment ID found in the JSON of the above action.

Jonathan Ford Newsletter
Join the newsletter to receive the latest updates in your inbox.